The Book Aadhaar Appointment service of taking an online appointment at Aadhaar Seva Kendra or Centers for various Aadhaar related services has been bought back online. This facility of booking Aadhaar Appointment was available since the inception of the UIDAI portal, but due to some issues, the service was removed from the portal. Finally after a long wait, the Online Aadhar Appointment Booking has been re-launched by the UIDAI with a lot of improvements on its official portal.
Table of Contents
Book Aadhaar Appointment Online Benefits
Skip the Queue and Book Appointment for Aadhaar update or enrolment: The resident can book an appointment at any nearby Aadhaar Seva Kendra according to their preference by keeping in mind the availability of time slots at Aadhaar Seva Kendra.
Save Time: Residents can save their valuable time by booking the appointment online for visiting the Aadhaar Kendra and avail of Aadhaar Services.
No Queue for pre-booked appointments: By using this facility you won’t have to wait in queue for your turn, just walk into the Aadhaar Seva Kendra as per your appointment and get your Aadhaar enrolment or update done.
This is a free service: Booking Appointments Online for Aadhaar update or enrolment is a free service, so there is no requirement to pay for this premium kind of service.
Mandatory to Book Online Aadhaar Appointment
Aadhaar Seva Kendra accommodates not only residents who have booked appointments but also those who visit the Kendra without prior appointments for enrolment or updates.
However, residents visiting the Kendra without appointments on a random basis do not have a guarantee of being accommodated. This is because the Aadhaar Seva Kendra may be occupied with enrolling or updating the Aadhaar details of residents who have scheduled online appointments, potentially exhausting their daily quota.
Please note that this information is subject to change and may vary based on the specific guidelines and policies implemented by the Aadhaar Seva Kendra.
Book Appointment of Aadhar Card
Residents have the privilege to ask aadhaar appointment or schedule appointments for various Aadhaar services, including:
| Fresh Aadhaar Enrolment | Name Update |
| Address Update | Mobile No. Update |
| Email ID Update | Date of Birth/ Age Update |
| Gender Update | Biometric (Photo + Fingerprints + Iris) Update |
So for almost all Aadhaar Services a resident can book an online aadhaar appointment and get their work done quickly without any worries.
For Aadhaar Slot Booking the resident will need to visit the UIDAI’s official website by entering URL https://uidai.gov.in/
Once visiting the URL, from the home screen select the language in which you wish to access the website
On selecting the language, the homepage will be presented
From the homepage click on the Book an Appointment option appearing under the Get Aadhaar Category
Book an Appointment page will load up on the next screen
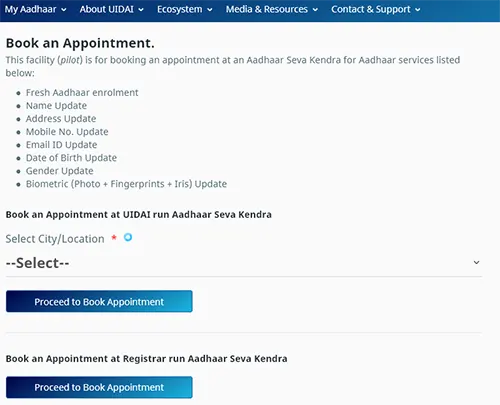
On the Book and Appointment page, there will be options available:
Book an Appointment at UIDAI run Aadhaar Seva Kendra
Book an Appointment at Registrar run Aadhaar Seva Kendra
Book an Appointment at UIDAI run Aadhaar Seva Kendra will support limited number of cities which appears in the list. If your city is not appearing in the list then you can book an appointment for Aadhaar by selecting Book an Appointment at Registrar run Aadhaar Seva Kendra.
Step by step we will cover both the modes of booking Aadhar Card Appointment Online.
Book an Appointment at UIDAI run Aadhaar Seva Kendra
From Book an Appointment at UIDAI run Aadhaar Seva Kendra, if your City/Location is appearing in the list of the booking portal, then just select your City/Location from the list and click on the proceed to book appointment button
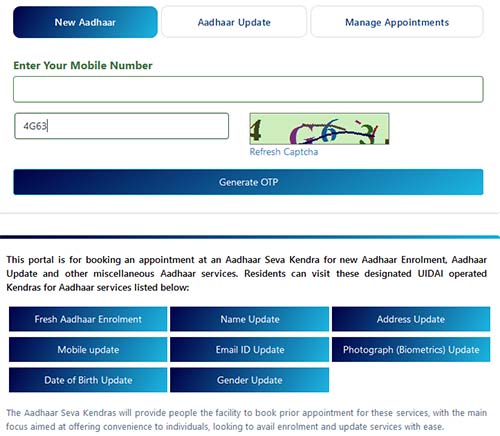
Book Online Appointment at Aadhaar Seva Kendra page will be presented on the next screen, from this page select the service which you want to avail from the options available such as Aadhaar Update, New Aadhaar and Manage Appointment
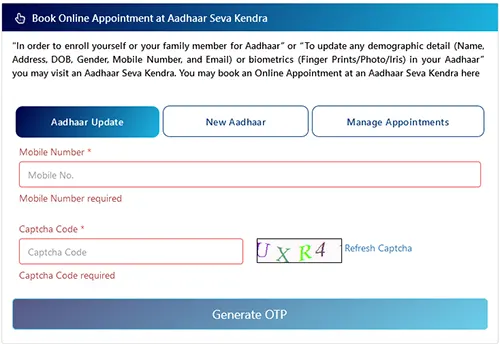
To book appointment to update any details in Aadhaar Select Aadhaar Update, to enroll for fresh Aadhaar select New Aadhaar, and the manage appointments option is to manage the already booked appointments
Once selecting Aadhaar Update or New Aadhaar, enter your mobile, solve the captcha code and click on the Generate OTP button
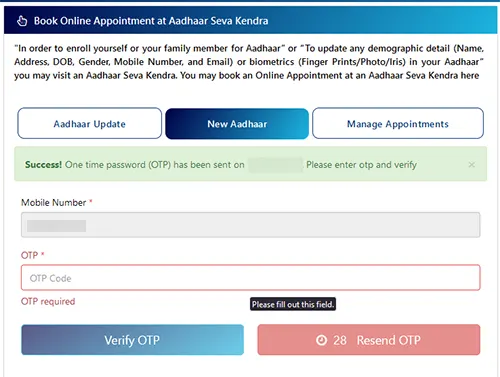
A One Time Password will be sent on your mobile number, enter the received OTP Code and click on the Verify OTP button
New Aadhar Card Appointment

From the Appointment Details section, select the resident type from resident or non-resident of India (NRI), the appointment type will be already selected as per option which you selected on previous page, under application verification type select whether the applicant will enroll for Aadhaar using document or using HOF (If Applicant do not have POI/POA/DOB. Please select HOF in Verification Type and present POR document), from the state, city, select the location of appointment state, and city
Next select the Aadhaar Seva Kendra from the list and click on the Next button appearing below
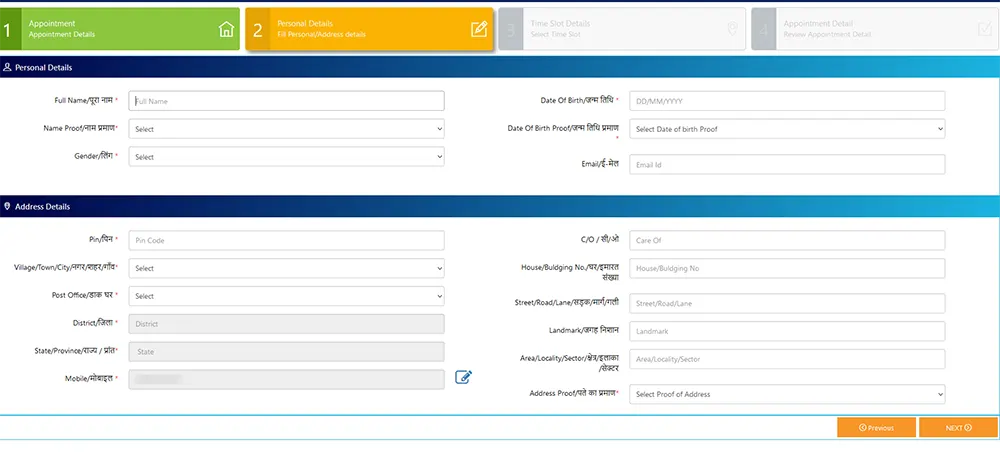
The next step will be of filling up the personal details, enter your personal details like Full Name, Date of Birth, Name of Proof, Date of Birth Proof, Gender, Email id, select the Name Proof and Date of birth Proof document which you will furnish from the list and in address selection fill the complete address asked in the form, select the Address Proof document which you will furnish from the list and click on the Next button
From the next page, you will have to make a selection of appointment date and time as per available slots
If the time slots are appearing in red color then it means Not Available (Due to time over or max slot booked.) and slots in white denotes Available Slot
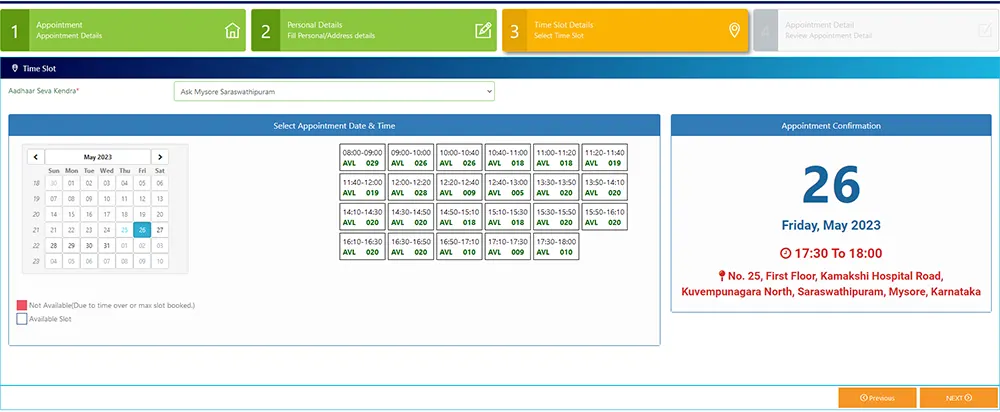
Select the date and time from the available slots and click on the Next button
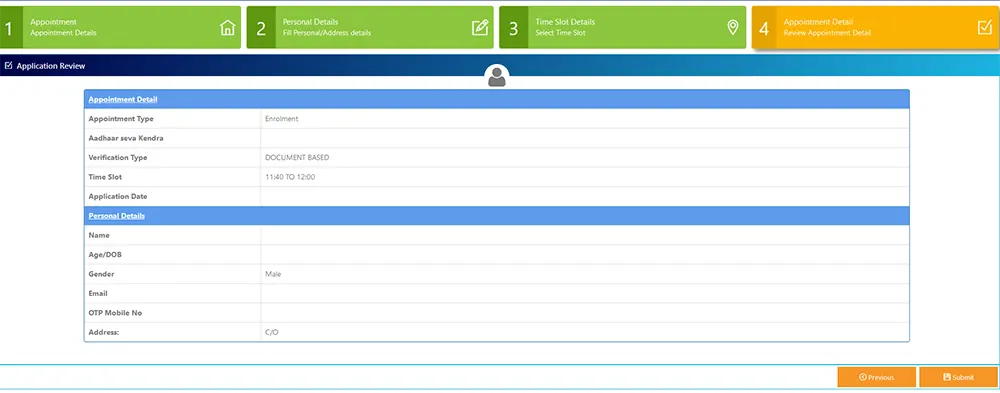
On next page, your appointment details will appear. Just have review if everything appears correctly and click on the submit button
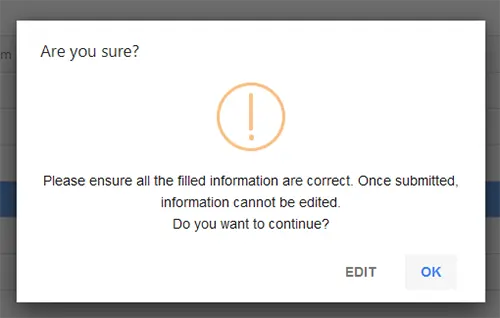
A popup message will appear requesting you to “Please ensure all the filled information are correct. Once submitted, information cannot be edited. Do you want to continue?”
Just click on OK button to proceed
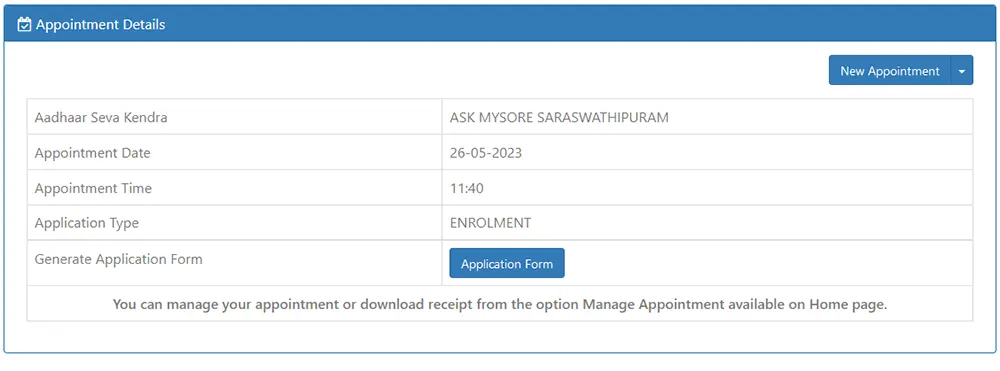
Your appointment for Aadhaar enrolment will be booked successfully and the appointment details will be displayed, you will also receive SMS on your mobile number containing the appointment reference number of your appointment
Below there will a button to generate application form, just click on that generate application form and your Aadhaar enrolment form will be generated with the details which you submitted
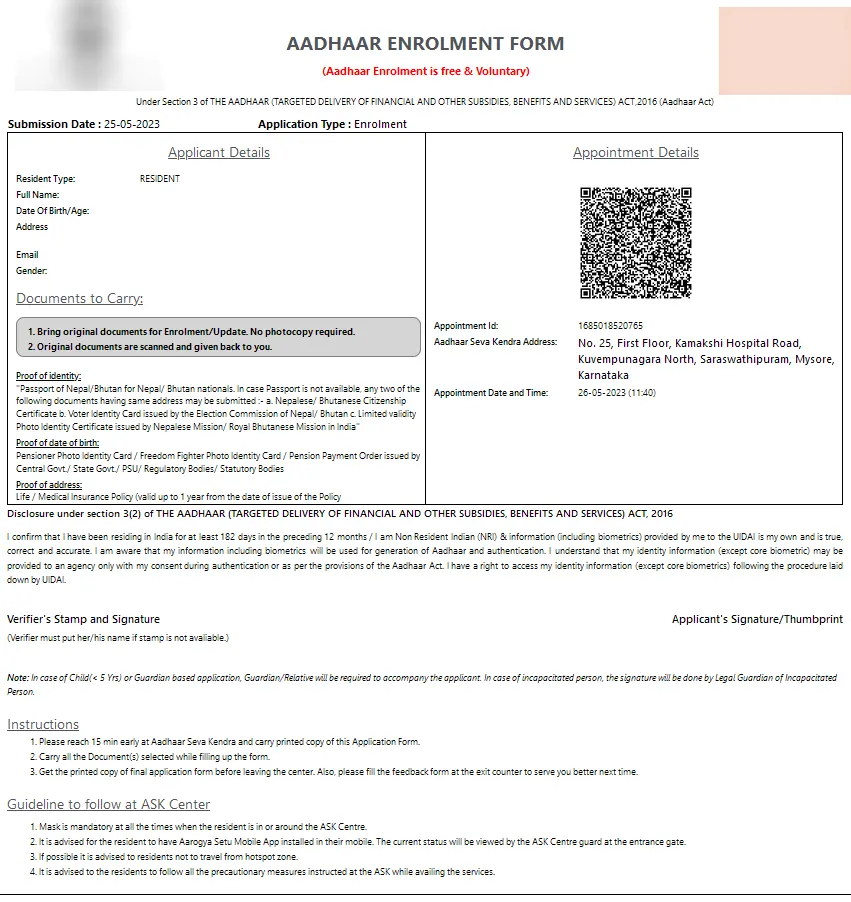
Just download the application form and print it on an A4 size paper in black and white
Once taking a printout of the form, you will need to sign or thumbprint in the area where Applicant’s Signature/Thumbprint is mentioned
You don’t need to fill an additional form for your Aadhaar Enrolment at the Seva Kendra, just you need to take this printed form along with documents for the enrolment. The generated form will also contain details of your appointment like your appointment id, appointment date and time, and Aadhaar Seva Kendra Address.
If you have got more members you can book more appointments by clicking on new appointment button and following the same process.
If in case you skip this appointment then you can’t use this same form to enroll for Aadhaar as it contains the appointment id and date. You will need to book an appointment again or reschedule the appointment.
Aadhar Card Update Appointment
If you have selected to take appointment for Aadhaar Update, appointment details page select the Resident Type from resident or non-resident of India (NRI)
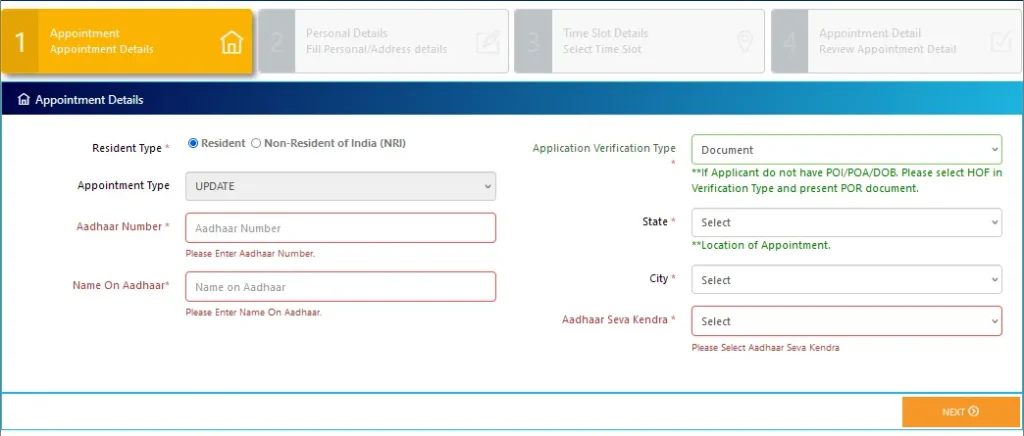
As you had selected to update Aadhaar in the Appointment type Update will be selected
Enter your Aadhaar Number which needs to be updated, and in the below name on Aadhaar field enter the name as it appears in Aadhaar Card
Under Application Verification Type select whether you will furnish documents to update Aadhaar or If Applicant do not have POI/POA/DOB. Please select HOF in Verification Type and present POR document.
Select Location of Appointment by making selection of State, City and Aadhaar Seva Kendra
Click on Next button to proceed
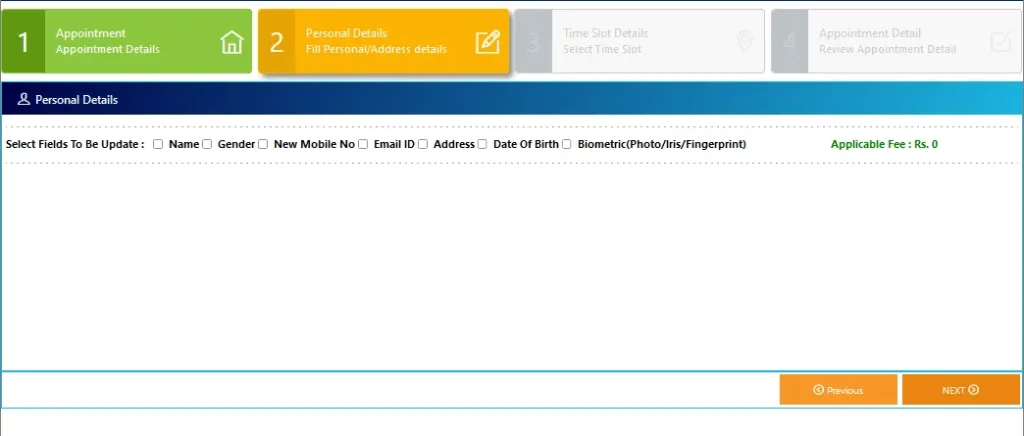
From the Personal Details page, select the fields from the list to be updated such as Name, Gender, New Mobile No, Email ID, Address, Date of Birth, and Biometric (Photo/Iris/Fingerprint)
As per your requirement, you can tick mark on one field or multiple fields which needs to be updated
Once selecting the field which needs to be updated, the applicable fees will be calculated and displayed at the application fee section
As per the details which you tick marked to update, in the below field you will need to enter the new details which you wish to update like new name, gender, email, mobile, address, etc, as well you need to select the name proof document, date of birth document, address proof document from the list which you would be furnishing in case if you have selected to update these details
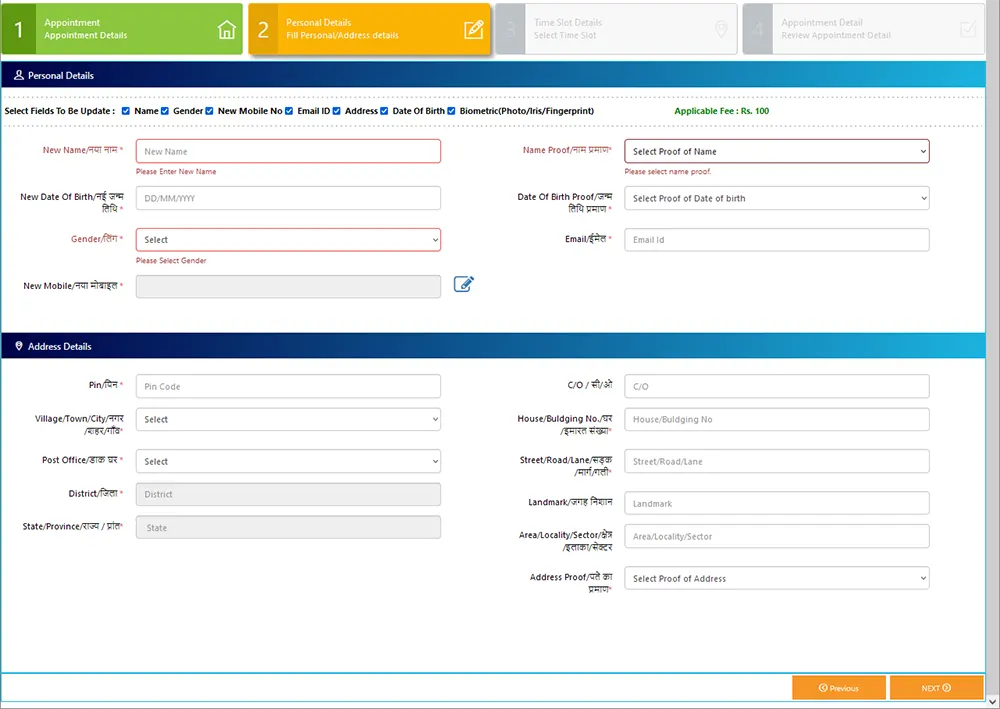
Once entering the personal details correctly click on the next button
From next page Select Appointment Date & Time (if the time slot is appearing in red box it means Not Available (Due to time over or max slot booked.) and if it appears in white box then it means slot is available to book)
Once selecting the slot date and time, click on the next button
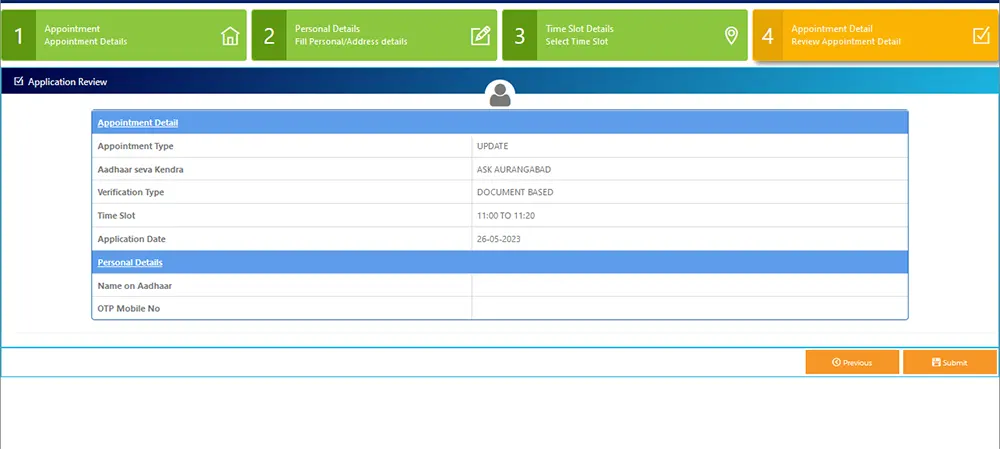
On next screen you will get to review the details, if everything is correct click on the submit button
A popup will appear with a message requesting you to “Please ensure all the filled information are correct. Once submitted, information cannot be edited. Do you want to continue?”
Just click on OK button to proceed
Your appointment for Aadhaar update will be booked successfully and the appointment details will be displayed, you will also receive SMS on your mobile number containing the appointment reference number of your appointment
There will a button to download the Aadhaar Update application form which will be prefilled, you need to just click on that generate application form and your Aadhaar update form will be generated with the details which you submitted
Download and print the form
Once taking a printout of the form, you will need to sign or thumbprint in the area where Applicant’s Signature/Thumbprint is mentioned
You don’t need to fill an additional form for your Aadhaar Update, just you need to take this printed form along with documents for the update if required depending on details which you need to update. The generated form will also contain details of your appointment like your appointment id, appointment date and time, and Aadhaar Seva Kendra Address.
If you have got more members who needs t update Aadhaar along with you then you need to book appointment for them separately by clicking on new appointment button and following the same process.
Manage Appointments at UIDAI run Aadhaar Seva Kendra
The manage appointments option on aadhaar appointment page lets you to manage the already booked appointments of new Aadhaar or update. To manage already booked aadhaar appointment follow the below steps.
Visit the Official UIDAI Website
Select language from the list in which you want to access the portal
Click on Book an appointment under Get Aadhaar section
Select your city from the Book an Appointment at UIDAI run Aadhaar Seva Kendra and click on the Proceed to Book Appointment
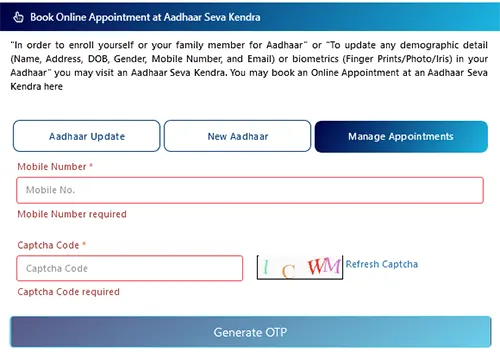
From the Aadhaar Update, New Aadhaar and Manage Appointments option, click on the Manage Appointments
Enter the mobile number which you had used previously to book an appointment, solve the captcha security code and click on the Generate OTP button
Enter the received OTP code and click on the submit button
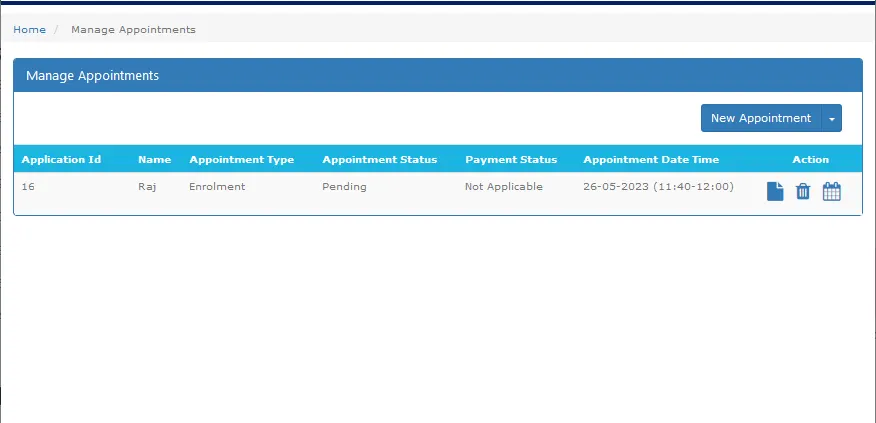
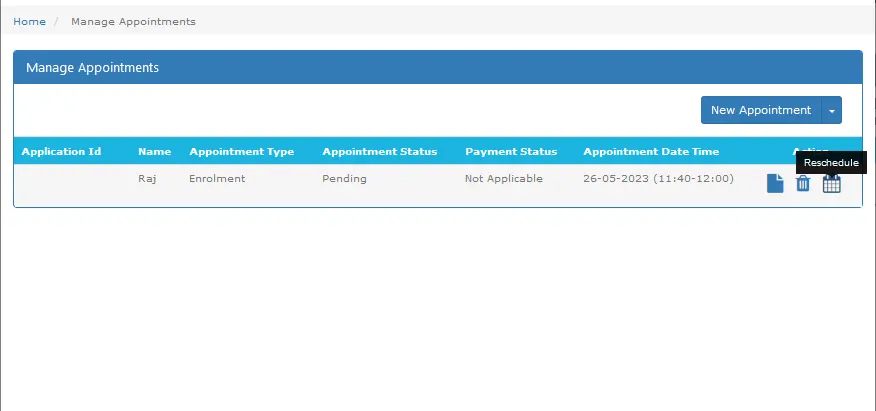
On the next page the appointments booked by you will appear, under action selection there will be three options which is View Application Form, Cancel Appointment and Reschedule
On clicking View Application Form you will be able to view or print the application form of your appointment also known as Aadhar Card Appointment letter download pdf
Cancel Aadhaar Appointment
The Appointment cancellation is not allowed on the date of Appointment. However if you have any upcoming appointments on later days then they can be cancelled.
If for some reason you wish to cancel the appointment then you can just click on the cancel appointment icon
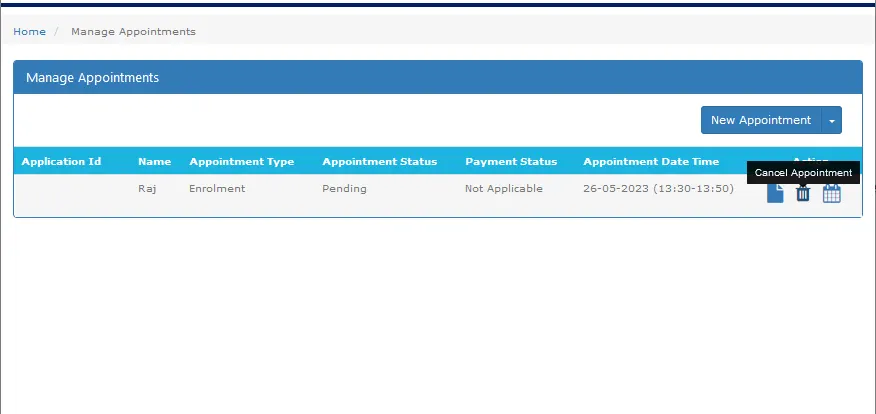
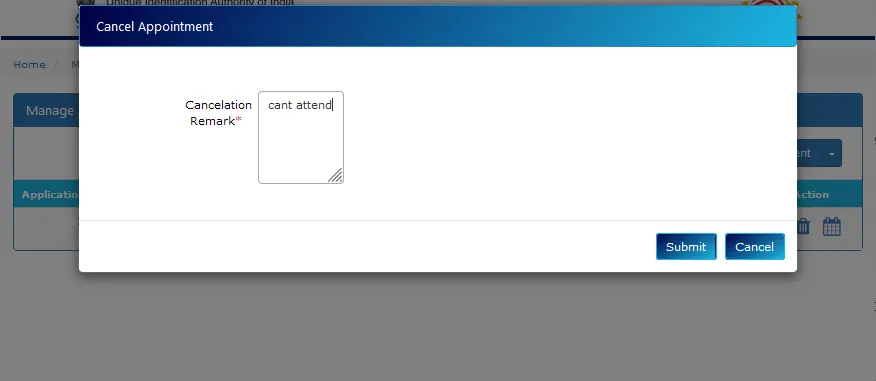
In the popup window, you will need to enter cancellation remark which is reason for cancellation and click on the submit button to proceed
A popup will appear confirming ‘Are you sure you want to Cancel ( 1XXXXXXXXXXXX) Appointment.This action is irreversible
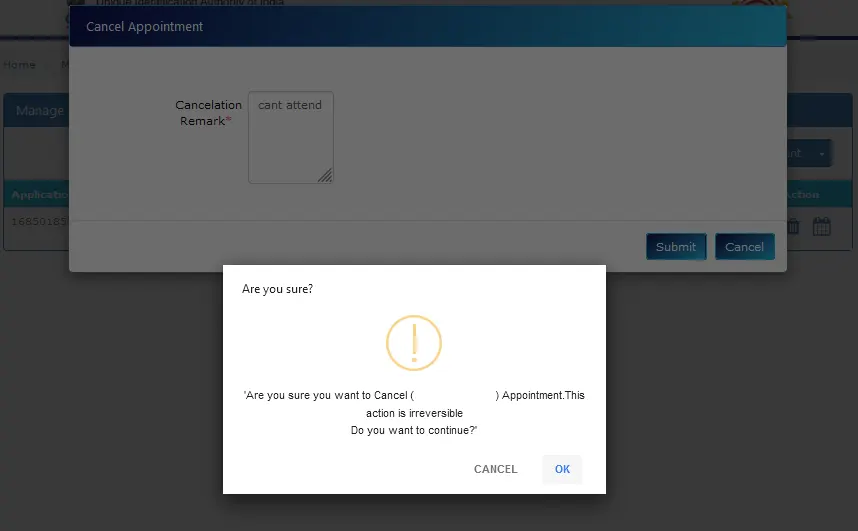
Just click on OK to cancel, and your booked appointment for Aadhaar will successfully get cancelled.
Reschedule Aadhaar Appointment
To postpone Aadhaar appointment on later date click on the Reschedule icon
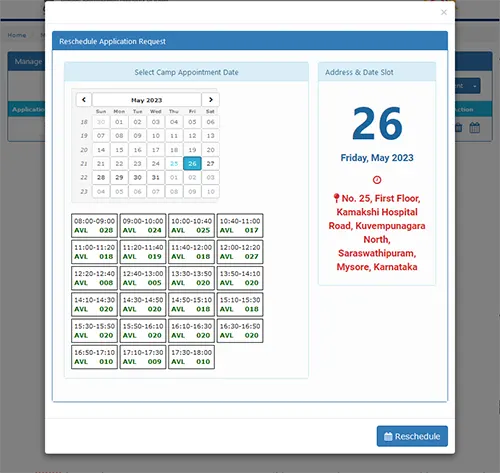
A popup will appear of Reschedule Appointment Request, reschedule the date of your appointment by selecting date and available time slot and click on the reschedule button
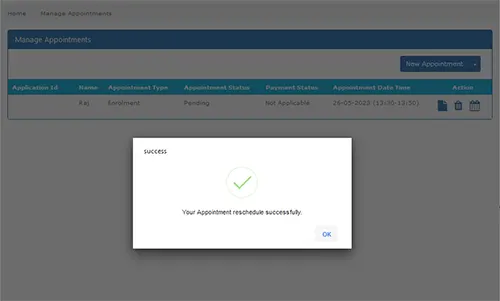
The appointment will successfully get rescheduled as per date and time slot which you selected
You will be able to download the new form with reschedule appointment by clicking on the view application
Book an Appointment at Registrar run Aadhaar Seva Kendra
If incase your City/ Location is not listed on the booking portal, then you can book an appointment by using the second option which is book an appointment at registrar run Aadhaar Kendra
Visit the official UIDAI Portal https://uidai.gov.in/
Make selection of language in which you want to access the website
From the Homepage click on the Book an Appointment under Get Aadhaar section
From the Book an Appointment page, click on Proceed to Book Appointment under Book an Appointment at Registrar run Aadhaar Seva Kendra
A new page will get open to book an appointment for Aadhaar in which you will need to make selection of your resident type from Indian resident or non-resident Indian (Select applicable resident type)
If you are Indian Resident you can login by entering mobile number or email id and if you are Non-Resident-Indian then you will have only one option which is login using email
Select login by mobile number or email id, enter the mobile or email id in the field
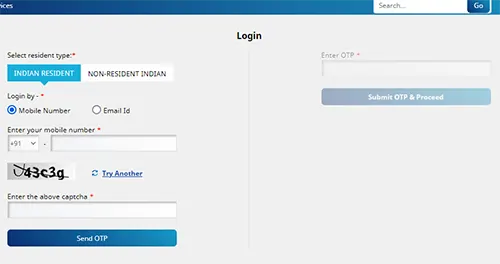
Solve the captcha security code and click on the Sent OTP button
One Time Password will be sent on your mobile or email address which ever details you entered
Enter the received OTP code in the enter OTP field and click on the Submit OTP and Proceed
On the next page, two options will appear whether you want to make an appointment for new enrolment or update Aadhaar
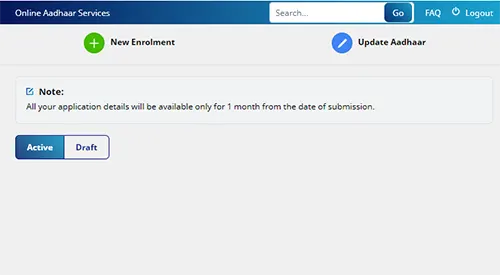
New Aadhaar Enrolment Appointment
To book an appointment for New Aadhaar, just click on the new enrollment icon
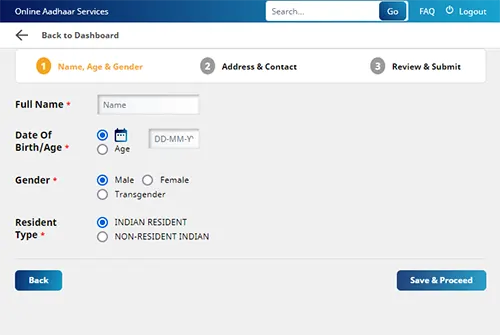
On the next page, you will need to mention your full name, date of birth or age, gender, resident type and click on the save & proceed button
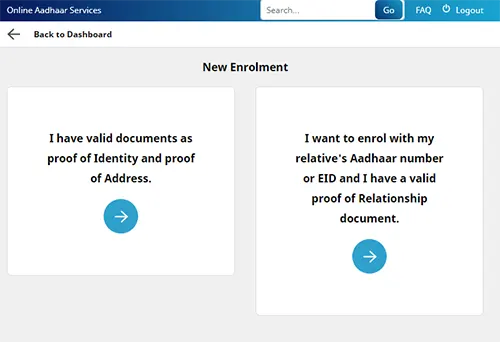
On next screen, you will be prompted whether you have proof of identity and proof of address proof document or you want to enroll with relative’s Aadhaar number or EID by using a valid proof of relationship document
If you have your own documents then just click on I have valid documents as proof of Identity and Proof of Address and in case if you don’t have documents in your own name then just click on I want to enroll with my relative’s Aadhaar number or EID and I have a valid proof of Relationship document.
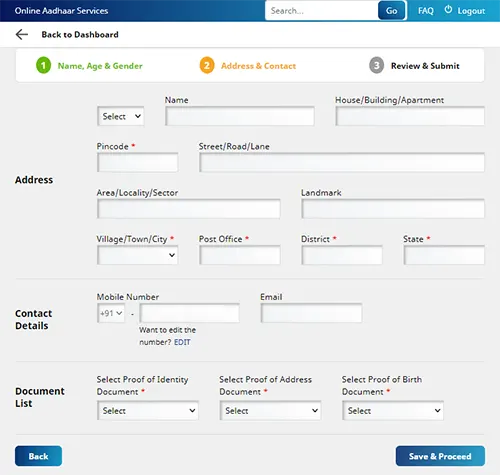
On next page, you will need to enter address details like C/O, House/Building/Apartment, Pincode, Street/Road/Lane, Area/Locality/Sector, Landmark, Village/Town/City, Post Office, District, State, mobile number, email address, select documents from the list which you would furnish and click on the save and proceed button
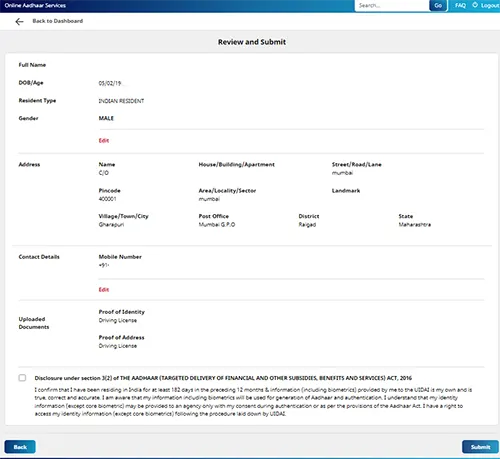
On the next page review details will appear, just review your details and undertake the disclosure by tick marking on it and click on the submit button
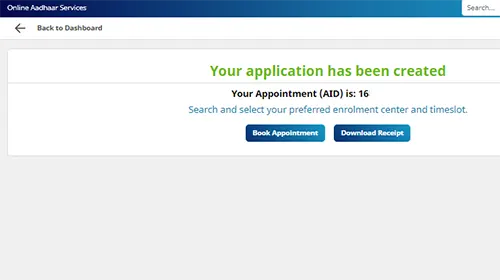
Your application will successfully get created, and it will also mention the Appointment ID (AID)
Below there will be two options Book Appointment and Download Receipt
To proceed selecting the enrollment center and the time-slot for enrollment click on the Book Appointment button
From the Search Enrolment Center page, search the Enrolment Center by entering the center name or pincode or by selecting state, district, post office, and village
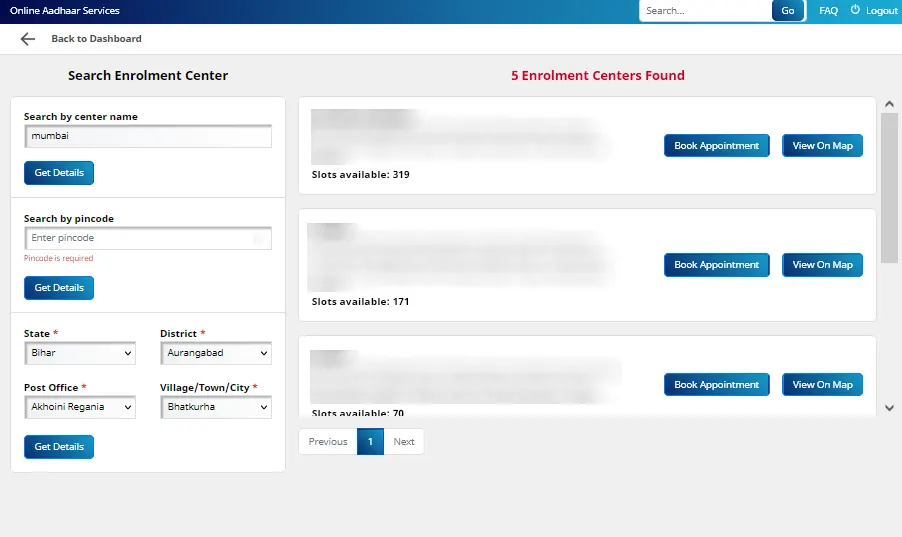
Select any enrolment centers from the result and click on the book appointment button against the result
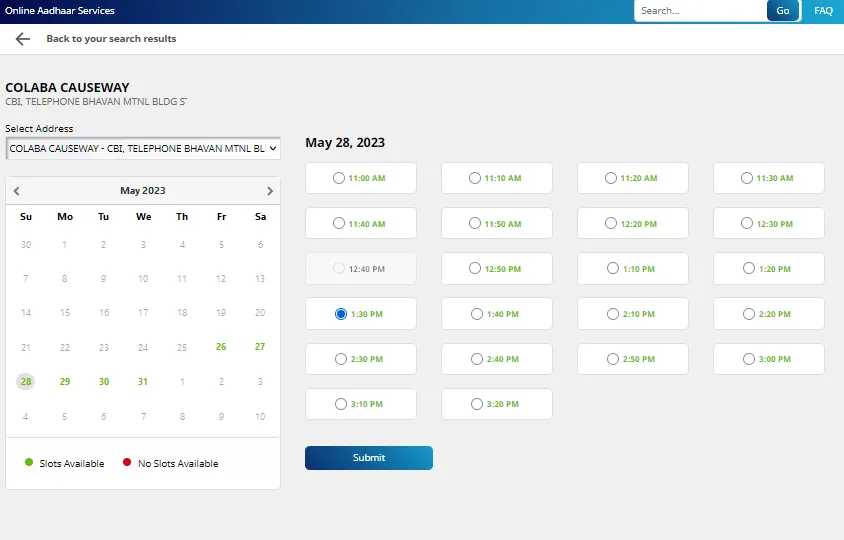
From the next screen select the date and time from the available slots and click on the submit button
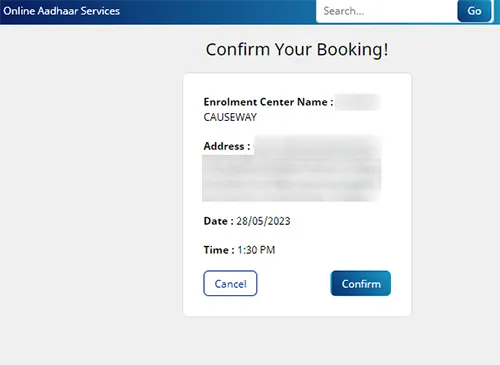
A booking confirmation will appear with your details, just click on the confirm button to proceed further confirm the booking
On the next page, your prefilled Aadhaar Enrolment form will get generated on which your details will be already printed with booking id, date and time of the appointment and enrolment center details
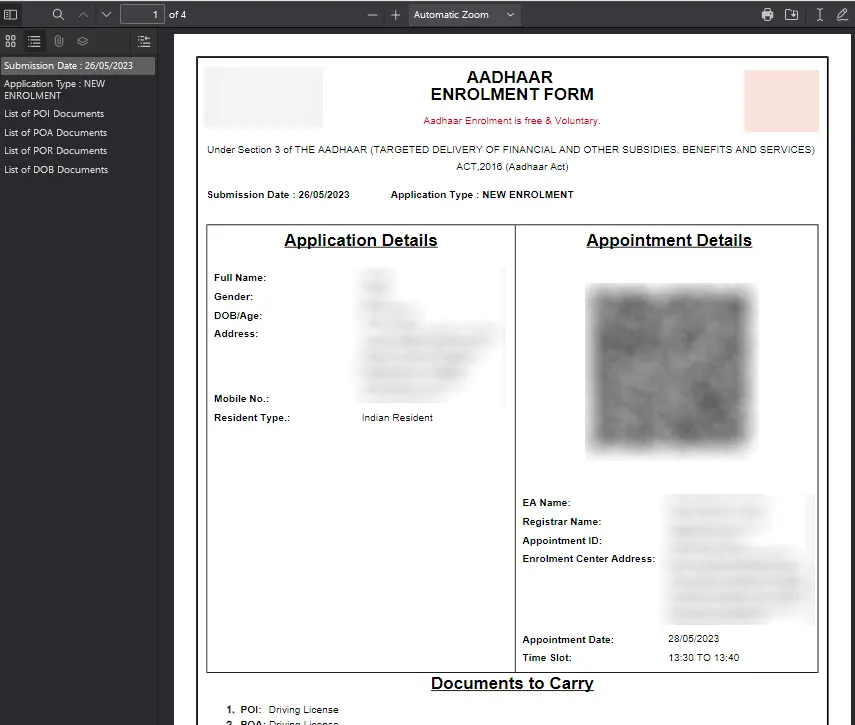
Just download and print this form
You won’t need to fill any Aadhaar enrolment form at the center, you will need to take this printed form along with the documents on the appointment day and time for your enrolment of Aadhaar
Update Aadhaar Appointment
To book Aadhar card update appointment, just click on the update Aadhaar icon
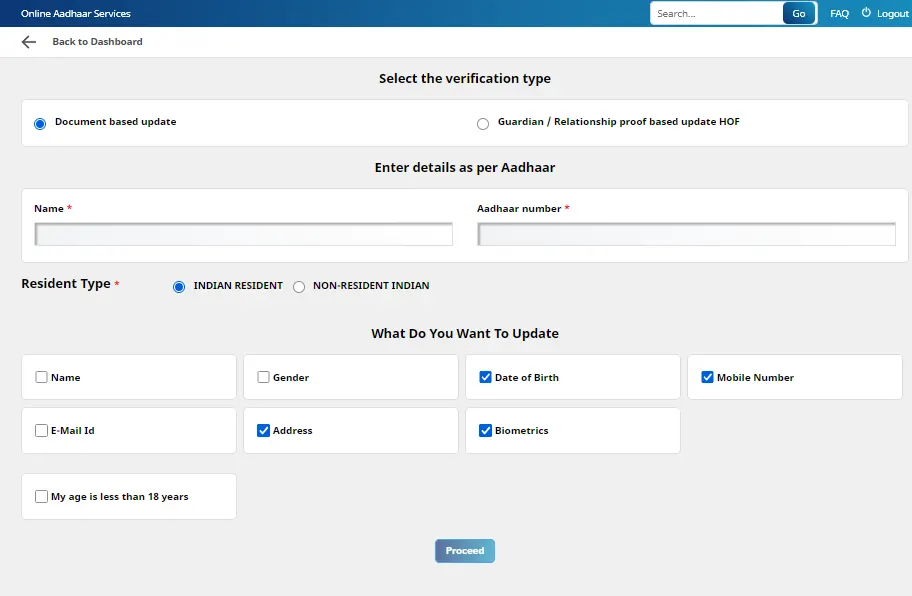
From next page, select verification type from document based update or Guardian/ Relationship proof based update HOF
Enter details as per Aadhaar such as Name, Aadhaar Number
Select resident type from Indian Resident or Non-Resident Indian
From what do you want to update, select the fields which you need to update in your Aadhaar and click on the proceed button
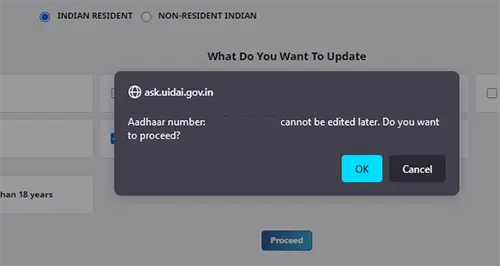
A pop-up will appear stating Aadhaar number: XXXX-XXXX-XXXX cannot be edited later. Do you want to proceed?, just click on OK to proceed
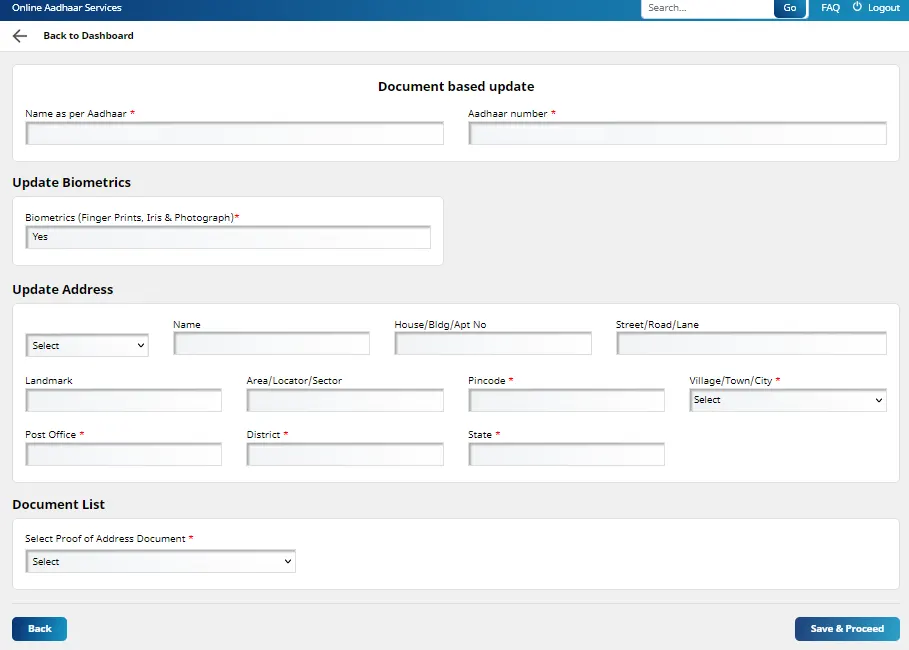
On next page, you need to enter the new details which you need to update like address, name, date of birth, gender etc. as per the fields you selected
Select the document from the list which you would furnish to update the details and click on the Save and Proceed button
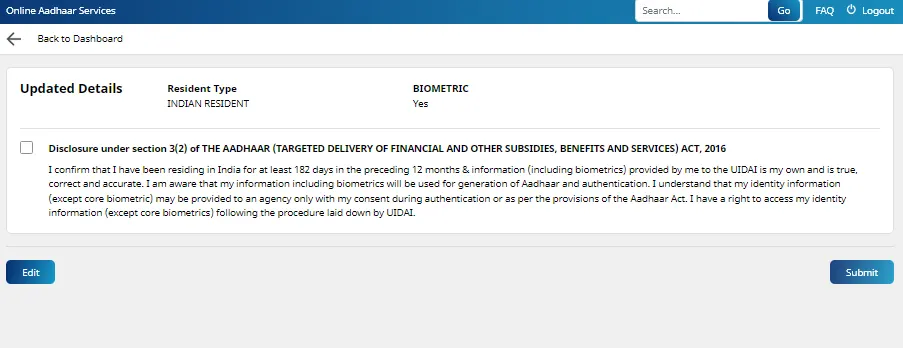
From next page, Agree to the disclosure by tick marking on “Disclosure under section 3(2) of THE AADHAAR (TARGETED DELIVERY OF FINANCIAL AND OTHER SUBSIDIES, BENEFITS AND SERVICES) ACT, 2016” and click on the submit button
Your application will successfully get created, next you need to book an appointment by searching enrollment center or you can even book India Post Aadhaar update appointment and then book the date and time slot for appointment. Click here to know the process on how to book an appointment.
Once booking appointment for New Aadhaar or update the next thing which you need to do is visit the Aadhaar Center on the appointment day at selected time slot with the printed form and documents.
And get enrolled for new Aadhaar or get Aadhaar Updated.
You need to reach 15 minutes early at Aadhaar Seva Kendra and carry printed copy of this Application Form
Do not damage the QR Code by folding the Application form across it
With the above method, you can book an appointment for Aadhaar at Aadhaar Seva Kendra as well as banks which are offering Aadhaar services. But some banks have also designed a dedicated Aadhaar appointment page on their official bank website itself. So if you want to enroll or update Aadhaar then you can visit the bank official website and make an appointment online.
Manage Appointments at Registrar run Aadhaar Seva Kendra
To manage the appointments booked at Registrar run Aadhaar Seva Kendra, select the resident type
Enter mobile number or email address
Solve the Captcha Security Code and click on the Send OTP button
On next page all your appointment details will be available
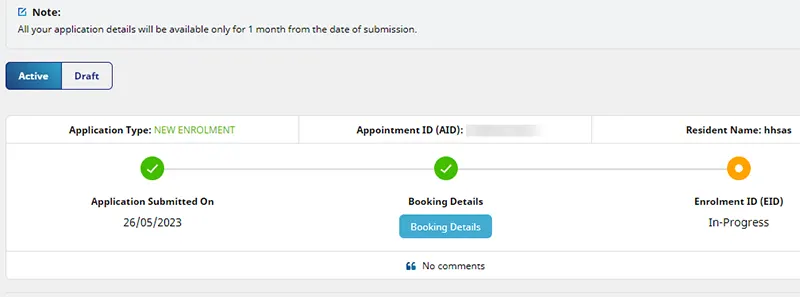
Click on the booking details under the application
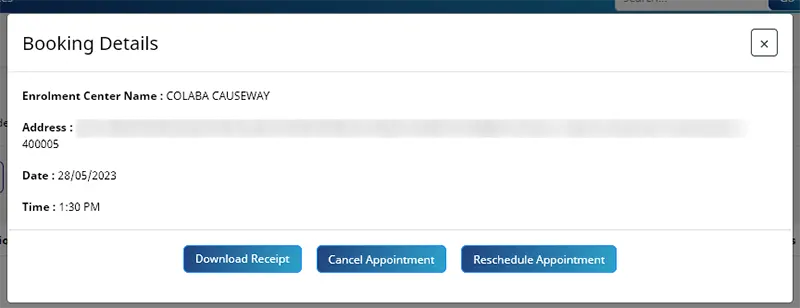
A popup with booking details will appear, it will have three options such as Download Receipt, Cancel Appointment and Reschedule Appointment
To download the form, click on the download receipt
Cancel Appointment
To cancel the appointment click on the cancel appointment button
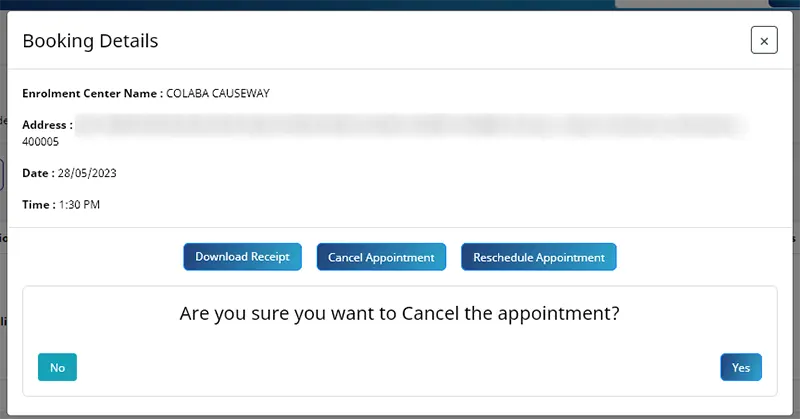
A message will appear “Are you sure you want to Cancel the appointment?”
Click on the Yes button
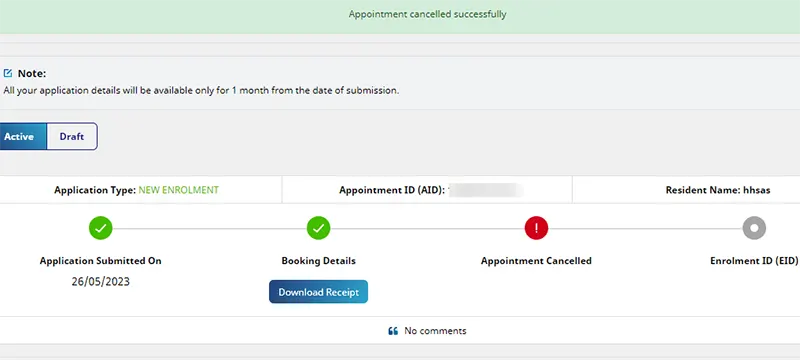
The appointment will successfully get cancelled.
Reschedule Appointment
To Reschedule Appointment on later date, click on the Reschedule Appointment button
A message will appear “Are you sure you want to Reschedule the appointment?“
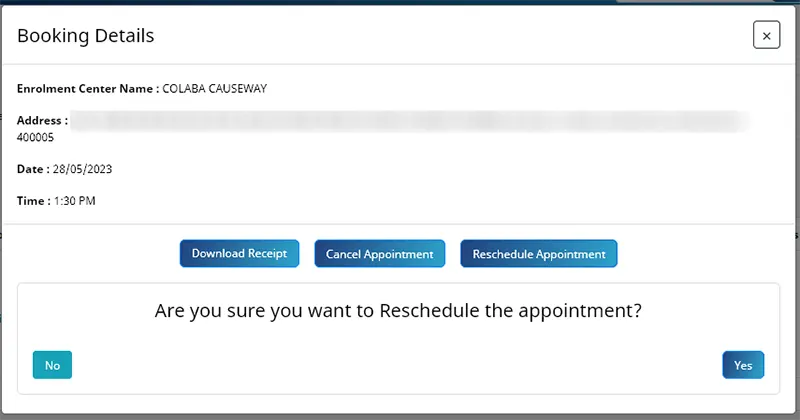
Click on the Yes button
Search Enrolment Center and book appointment by selecting different date and time slot.
If you are getting such error you should try cancelling it after some time.
If you are encountering an error message stating “Appointment cancellation is not allowed on the date of Appointment,” it means that you are not permitted for do cancellations on the same day as the scheduled appointment. This restriction is likely in place to ensure smooth operations and maintain the integrity of the appointment scheduling process.